The Pencil Eraser’s Unexpected Past
The pencil eraser’s unexpected past runs from bread crumbs to rubber and the attached nub, revealing how a simple correction became portable.
Why did people once reach for bread to erase a pencil mark, and how did a rubber nub end up fixed to a pencil? The pencil eraser’s unexpected past is a story of changing materials and a small design choice that made correction easier to carry.
Start with the familiar object: a pencil, an eraser, and a mark that can be changed. The broad outline is clear, though details of early use and product development vary across historical accounts. Looking at the tool’s materials helps make that history tangible without pretending there was one inventor or a single decisive moment.
Bread could lift graphite before rubber took hold
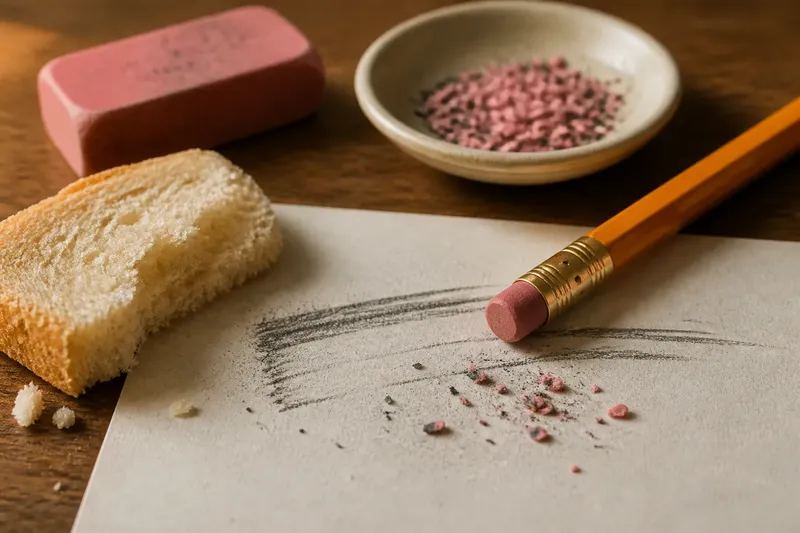
Before rubber erasers became commonplace, soft bread was used to lift graphite from paper. The method was simple: press or rub a soft piece against the mark and let it pick up some of the graphite. Bread was readily at hand, but it could dry out, crumble, and spoil, making it an awkward tool to keep ready for repeated corrections.
Rubber offered another material that could rub away pencil marks. The word “rubber” is commonly linked to this use of rubbing out marks, though a short account cannot settle every detail of the word’s history. Early natural rubber also had practical limitations: its qualities could change with conditions, and making dependable rubber goods required better ways to process it.
These materials did not switch places in one clean moment. Bread remained an accessible makeshift option, while rubber became more useful as processing improved and manufactured goods became easier to use consistently. The eraser’s history is less a tale of a lone invention than of a familiar task finding a more convenient material.
Rubber processing helped make erasers practical
Natural rubber is derived from latex, a material collected from certain plants. In its raw form, rubber could be sticky or changeable, so it was not automatically a neat, dependable eraser. The development of rubber processing made it more suitable for manufactured objects, including erasers.
That change matters because an eraser has to do more than touch a mark. It needs to rub against paper, loosen graphite, and remain manageable in the hand. Later erasers also came to be made from synthetic materials; the exact composition varies, so color and feel alone cannot identify what is inside a particular eraser.
Try a small comparison on scrap paper: make two graphite lines, one lightly and one firmly, then rub each with the same eraser using gentle strokes. The lighter line may fade more readily, while the firmer line may leave a trace. This is a demonstration of the interaction between pencil, paper, and eraser—not a universal rule about every material.
The attached eraser turned correction into part of the pencil
A separate eraser gives the hand a larger block to hold and can be used from several angles. Attaching a smaller eraser to a pencil traded some of that surface area for convenience: the tool for writing and the tool for correction traveled together.
The metal band at a pencil’s end, often called a ferrule, holds the eraser in place. The arrangement is like keeping a key on a key ring: a useful companion is less likely to be left behind because it stays joined to the object it serves. The small nub is not simply decoration; it makes revision available without searching through a desk or bag.
The familiar pencil-end eraser is part of a broader history of combining tasks in one portable object. Its compact design suited quick corrections, while a loose block remained useful for larger areas. Neither form made the other obsolete; each offered a different balance of reach and convenience.
What can a mark and its crumbs tell you?
Write a short graphite line on scrap paper and erase it gently. Watch the line fade, then look at the crumbs and the page. The eraser rubs against the paper and gathers loosened graphite along with bits of eraser material; a soft brush can move the debris without rubbing it back into the sheet.
Compare the erased place with a blank patch nearby. You might see a faint shadow, altered paper fibers, or no obvious change. The result depends on the paper, pencil, eraser, and pressure, so treat it as evidence about that particular page rather than a verdict on every eraser.
Say you have written “garden” in graphite on a scrap envelope, but the label should say “garage.” You erase only the first word, brush the crumbs away, and write the replacement in the same space. The expected result is a changed label with the surrounding marks intact, though a faint trace or disturbed paper may show where the first word was.
Why do pencil erasers work differently?
What does a pencil eraser remove?
A pencil eraser helps lift graphite from paper through rubbing and friction. It can also disturb the paper surface, so an erased patch may look or feel different from the untouched area.
Why do some erasers leave more crumbs?
Eraser materials interact differently with paper and graphite, producing varying amounts of debris. Crumbs are a byproduct of rubbing, not a reliable measure of how completely a mark has disappeared.
Is a loose eraser better than an attached one?
A loose block generally offers more working surface, while a pencil-end eraser is convenient when you need a quick correction. Choose according to the size of the mark and the eraser’s intended use.
Can a pencil eraser remove ink?
A standard pencil eraser is meant for graphite, not ordinary ink. Specialty products may suit particular inks or surfaces, but check the package instructions before using one on a page you want to preserve.
What should you inspect on an old pencil?
Check whether the eraser is present or missing; if it is missing, then treat the pencil as a writing tool without an attached correction aid, or pair it with a loose eraser.
Check the eraser for cracks or a hardened surface; if it is brittle, then avoid rubbing it hard on a valued page and use a suitable separate eraser instead.
Check whether the ferrule is bent or loose; if it shifts, then do not rely on the attached eraser and choose a stable loose block for corrections.
Check the wood around the ferrule for splits; if the wood is damaged, then handle the pencil gently or set it aside rather than forcing the end.
Check for graphite dust near the point; if the point is intact, then the dust may simply reflect use, but if the point is broken, then sharpen it before writing.
Check whether a label names the eraser material or intended surface; if it does, then follow that information, but if it does not, then avoid guessing the composition from color or feel.
Wear, a dented ferrule, or graphite dust can suggest how an object was handled, but appearance alone cannot establish its age. A worn eraser may reflect frequent use or storage conditions, so keep the observation narrower than the conclusion.
The pencil eraser’s unexpected past is easiest to see in the contrast between soft bread, processed rubber, and the small eraser fixed to a pencil. When you next change a graphite mark, look at the crumbs and the altered patch of paper: they show, in miniature, how a correction depends on both a material and the surface it touches.